Tutorial 14
Problem Statement
No software package can be created generally enough such that it can automatically handle every user’s exact display and interfacing needs. To offer the user with the greatest degree of customizability, Python has been fully integrated into GPS-X. Through integrating Python in GPS-X, advanced users have the ability to customize how they use GPS-X, from creating unique visuals to the automation of data collection. The use of this feature requires the user to be familiar with the Python programming language. Some basics of the Python language will be highlighted throughout the following tutorials, but they are not meant as a comprehensive guide for using Python.
In this tutorial, you will begin by familiarizing yourself with how Python is implemented in GPS-X and how Python can be customized. You will then learn how Python can be used to directly manipulate variables in a GPS-X simulation.
The GPS-X Advanced Tools module is required to complete this tutorial.
Objectives
After completing this tutorial, you should be able to create Python scripts that can run and manipulate GPS-X simulations.
GPS-X and Python - Basics
1. Open the Layout created in Tutorial 1 and save it as `tutorial-14’.
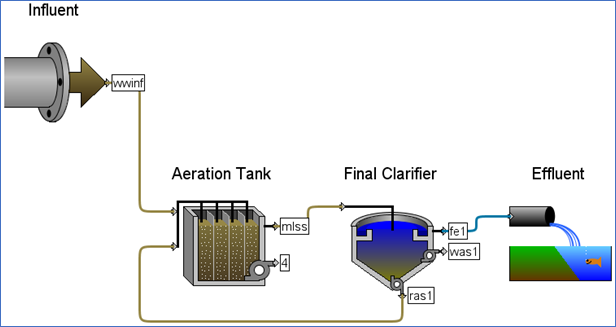
Figure 14‑1 – Tutorial 14 Layout
2. Switch to Simulation Mode if it is not already selected.
3. Open Python Script Manager. Python’s functionality within GPS-X is managed through the Python Script Manager.
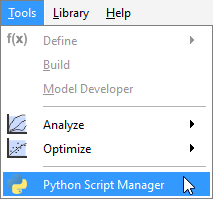
Figure 14‑2 – Accessing the Python Script Manager
4. Create a New Script. Pressing the new button will prompt you to create a new Python script. By default, the script will be saved in the same directory as the layout with the same name as the layout. Save the script using the default settings.
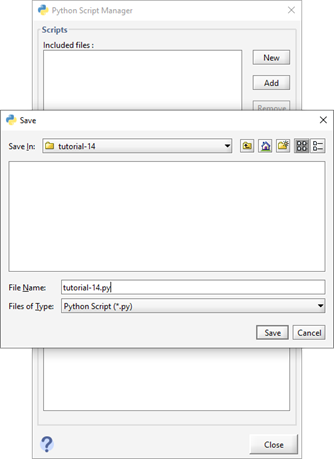
Figure 14‑3 - Creating a New Python Script in GPS-X
5. Edit the Script. With “tutorial-14.py” selected, which is indicated by the file name being highlighted in a dark blue color, press the Edit button. By default, this will open the Python script in Notepad.
|
|
By default, GPS-X is using Python version 3.7 and will expect scripts to follow Python version 3.7 syntax. These default settings can be changed by pressing the Python Settings button. GPS-X comes with versions 2.7 and 3.7 of Python installed and you can easily toggle between these versions from this menu. You can also specify other versions of Python on your machine that you would like GPS-X to use by selecting the other option in the Python Settings menu and specifying both the version number and the pathway of the Python instance. The default text editor can also be changed from this menu if desired. |
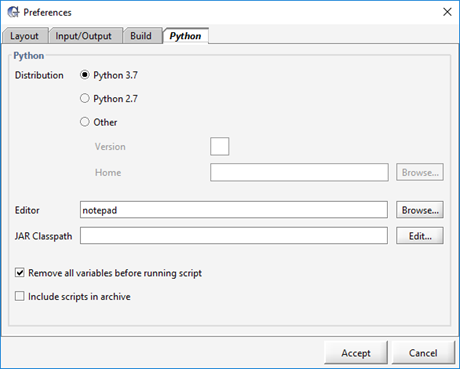
Figure 14‑4 - Python Settings Menu
6. Every Python script generated by GPS-X will be initially populated with 4 GPS-X recognized functions. An unedited Python Script generated by GPS-X can be seen in Figure 14‑5. The functions that GPS-X predefines in the script are:
i. start – This function is called a single time at the start of a simulation.
ii. cint – This function is called at each communication interval that occurs in the simulation.
iii. eor - This function is called a single time at the end of a GPS-X simulation.
iv. runSim – This function starts the GPS-X simulation within the Python script. A simulation will begin each time this function is called within the script.
Note that each function included within the default Python script template produced by GPS-X contains a Try Except block. The user code to be executed by each of these functions is entered in the Try portion of the included Try Except block.
The Try Except blocks in these functions are included to ensure any errors that may occur in the execution of a Python script are appropriately handled. If an error is encountered in the execution of a function in a Python script, the Try Except block exits the current function and prints the error that occurred. After exiting the function in which the error occurred, the rest of the Python script will then be executed.
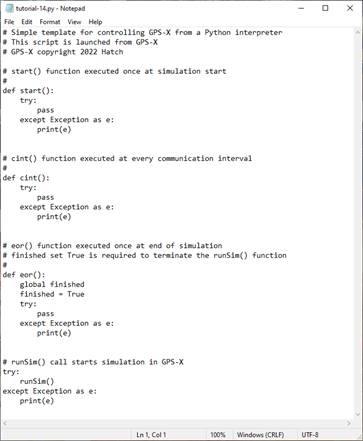
Figure 14‑5 – Python Script Generated by GPS-X
7. As a means to familiarize yourself with how the Python interfaces within GPS-X, we will begin with a Hello World example:
In the start() function, replace the pass command with:
print(“Hello”)
In the cint() function, replace the pass command with:
print(“ “)
Finally, in the eor() function, replace the pass command with:
print(“World”)
The updated script can be seen in Figure 14‑6.

Figure 14‑6 - Sample Python Script
8. Save the Script. After making changes to the script in Notepad, the file must be saved in Notepad before it can be run in GPS-X. This is done by selecting File > Save from the main toolbar in Notepad.
|
|
9. Run the Script. Return to the Python Script Manager. The “tutorial-14.py” script will currently be the only script available in the Python Script Manager, so it will be selected by default. Press the Run Script button to run the selected Python script within GPS-X. The Python Script manager will then run your Python script. |
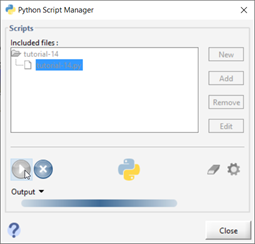
Figure 14‑7 - The Python Script Manager Running a Python Script
10. The results of the script appear in the Output pane of the Python Script Manager, which can be accessed by pressing the Output button. The results of the simulation can be seen in Figure 14‑8. “Hello” is the first output in the output pane and it appears only a single time. The output “Hello” appears first because the start function is called immediately when a simulation begins. The start function is not called again during the simulation, so “Hello” will only appears a single time. Likewise, “World” only appears a single time at the end of the output due to the end of run (eor) function only being called once at the end of the simulation.
In the output, the cint function is called twice during the simulation, creating the two blank lines between “Hello” and “World”. The cint function is called at every communication interval in the simulation which includes both the initiation of the simulation after the start function (t = 0.0) and when the simulation terminates prior to calling the eor function. Due to the stop time in this simulation being set to 0.0 days, cint will only be called at the initiation and termination of the Python script, causing two instances of “ “ to appear in the output.
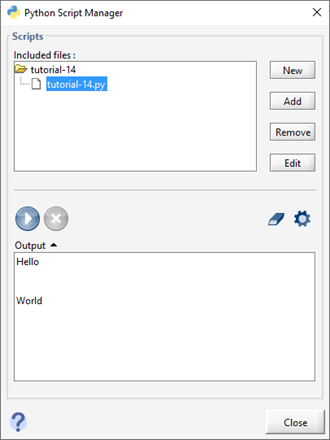
Figure 14‑8 - Results of Running the Python Script
GPS-X and Python – Basic Simulation
Now that you have an understanding of how Python scripts are used to communicate with GPS-X, we will move to an example that is more focused on how we can use Python to manipulate the variables within GPS-X.
11. Save a New Script. We have created a Python script for you to use during this portion of the tutorial. Locate and open the “tutorial-14-COD-Manipulation.py” Python script file located in the following subdirectory of the GPS-X instillation directory:
\layouts\08tutorials\
Save the script in the directory where the GPS-X file is currently saved.
12. Open the Python Script Manager.
13. Add the Script. When using an existing Python script, it must be added to the Python Script Manager before you can run it in GPS-X. Press the Add button.
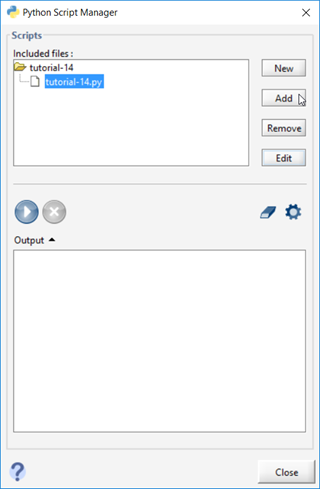
Figure 14‑9 - Adding an Existing Script to the Python Script Manager
Pressing Add will open the current working directory and show all Python files currently saved in the directory. Select the “tutorial-14-COD-Manipulation.py” file and open it to add it to the Python Script Manager.
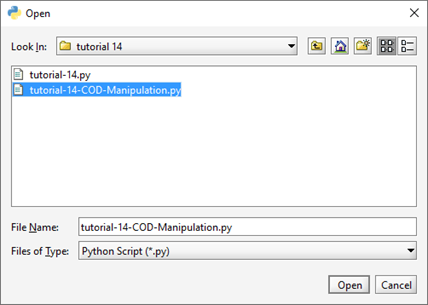
Figure 14‑10 - Adding the tutorial-14-COD-Manipulation File to the Python Script Manager
14. Edit the Script. Select the “tutorial-14-COD-Manipulation.py” script and press Edit. This will open the script in Notepad. We will now examine the important components of the Python script:
The start function can be seen in Figure 14‑11. The start function in this script is used to display the initial value of some GPS-X variables of interest. Python is then used to directly change the value of these variables in GPS-X. This is done using predefined commands that are recognized by GPS-X. The GPS-X recognized commands in the start function include:
· gpsx.getValue. This function is used to get the value currently assigned to a variable in GPS-X for manipulation in Python. To use the getValue function, you must enter the cryptic name of the of the GPS-X variable in the parenthesis as a string.
· gpsx.setValue. This function is used to assign new values to GPS-X variables directly through Python. To use this function, you must first enter the cryptic name of the GPS-X variable in the parenthesis as a string. The new value you would like to assign to the variable is then entered. Ensure that the appropriate Python variable type is used in this function.
Note: If you would like to toggle an ON/OFF switch in GPS-X, you must use the gpsx.setValue and assign it a value of 0.0 for OFF and a value of 1.0 for ON.
· gpsx.setTstop. This function is used to change the stop time of the current simulation in days. To use this function, simply enter the number of days you would like the simulation to run for in the parenthesis.
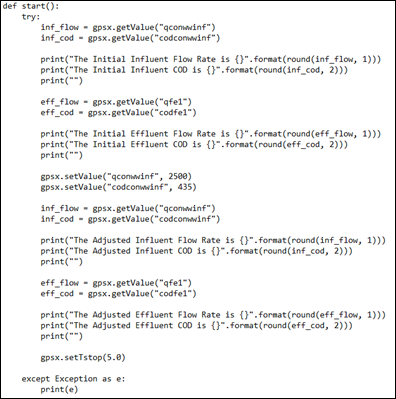
Figure 14‑11 - The Start Function in the tutorial-14-COD-Manipulation Python Script
The cint function can be seen in Figure 14‑12. Using the gpsx.getValue function, the cint function obtains the final values of our variables of interest.
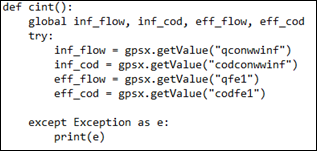
Figure 14‑12 - The cint Function in the tutorial-14-COD-Manipulation Python Script
The eor function can be seen in Figure 14‑13. This function is simply used to format the data collected in the cint function.
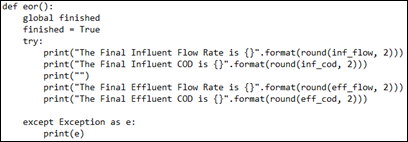
Figure 14‑13 - The eor Function in the tutorial-14-COD-Manipulation Python Script
15. Save the Script.
16. Run the Script. The simulation output can be seen in Figure 14‑14. From the output, it is important to note that changing the value of a GPS-X variable with Python will not have an immediate effect on the other variables in GPS-X. This is illustrated when looking at the Adjusted influent and effluent variables in the output. While Python changes the influent variables, the effluent variables remain unchanged. The effluent variables will not be calculated until the simulation resumes. You can use Python to access the newly calculated effluent variable values at the next communication interval.
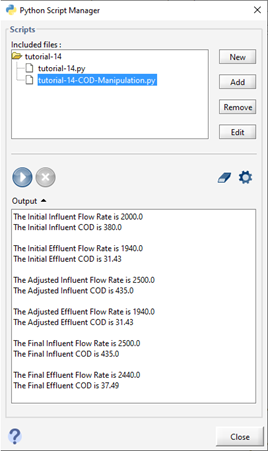
Figure 14‑14 - Output of the tutorial-14-COD-Manipulation Python Script
Installing Python Libraries
The power of using the Python programming language alongside GPS-X comes from Python’s active community of users making open-source libraries that preform a variety of functions in Python. To use these libraries, you are required to install them in the directory where you are running Python from. This tutorial will focus on the instillation of Python in a Windows environment assuming an internet connection is available for your machine.
17. Determine location of GPS-X Directory. To install new libraries in the GPS-X Python, you must first identify where GPS-X has been installed on your machine. By default, GPS-X will install at:
· C:\Program Files\GPS-X85
· C:\Users\username\AppData\Local\Programs\GPS-X85
· User specified location
If you are unable to find the GPS-X directory, you can right-click on the GPS-X shortcut and select Open file location which will open the location of the GPS-X executable in the GPS-X bin directory. The location where Python libraries will be installed is in the bin folders parent directory. Navigate to the parent directory, GPS-X85, and copy the path to this directory by right clicking on the file explorer address bar and selecting Copy address.
Alternatively, you can use the command prompt command where /R C:\ gpsx to locate the path to the GPS-X executable on your machine. Depending on the number of files on your machine, run times for this command may be long. Once the path has been found, you can copy the path to the GPS-X directory and exit the command.
Note, you must ensure you have the correct administrative privileges in the GPS-X directory on your machine to install new libraries. If you do not have the appropriate privileges, you may need to contact your IT department to get the correct privileges or libraries will be installed to the user install directory.
18. Open the Command Window. The command window can be opened by going to the start menu and typing ‘cmd’. Hit the Enter key.
19. Access the Directory. You need to access the directory where GPS-X has been installed on your computer. Once you have found the GPS-X directory, you will need to create a path to it in the command window.
In the command prompt enter:
cd <Paste address from step 17>
Press enter.
20. Navigate to the Python Directory. If you are using Python version 3.7, libraries will be installed in the folder named python37 in the GPS-X instillation directory. To navigate to this folder, enter the following in the command prompt
cd python37
If you are using Python version 2.7, libraries will be installed in the folder named python in the GPS-X instillation directory. To navigate to this folder, enter the following in the command prompt
cd python
Hit Enter to make this the active directory.
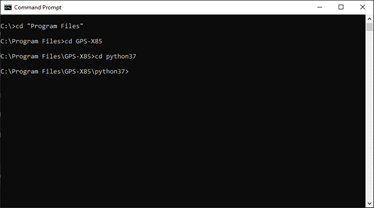
Figure 14‑15 - Accessing the GPS-X Python directory
21. Update pip. pip is a package installer included in the base Python instillation that is used to install libraries in Python. First ensure pip is fully updated by typing:
python -m pip install --upgrade pip
Press the enter key. Using an Internet connection, pip will search to see if any updates are available for the pip library. If updates are available, pip will update itself and any out of date dependencies. Note that the --user tag will be needed to install the libraries to your user install directory if you do not have the privileges to write to the GPS-X directory:
python -m pip install --upgrade --user pip
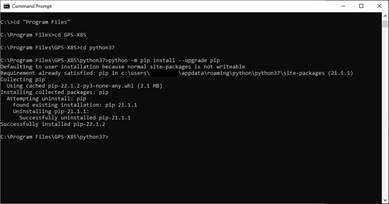
Figure 14‑16 - Updating the Python pip Package Manager
22. Install matplotlib. We will now be installing matplotlib, a library that is used for plotting data within Python. To install matplotlib, type the following into the command window and hit Enter:
python -m pip install matplotlib
pip will automatically install matplotlib and its dependencies in the specified directory. Note that the --user tag will be needed to install the libraries to your user install directory if you do not have the privileges to write to the GPS-X directory:
python -m pip install --user matplotlib
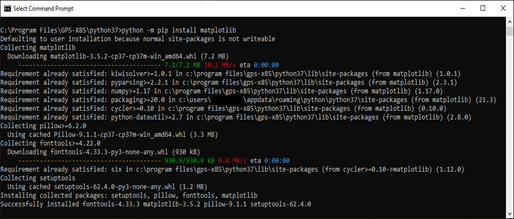
Figure 14‑17 - pip Installing matplotlib
23. Check the Install. Any libraries that you have installed to your version of Python can be seen in your GPS-X download directory. If you are using Python 3.7 go to:
>python37>Lib>site-packages
If you are using Python 2.7 go to:
>python>Lib>site-packages